Mushroom and Green Pea Risotto

We are back! First of all, Happy New Year! Secondly, apologies for my lack of recipes for the last few months. Covid lockdown took a couple of interesting turns for me, from being made redundant, to finally adopting a rescue dog, to starting a new job, but after the little ‘paws’ we’re back, and I’m excited to share some more of my favourite recipes.

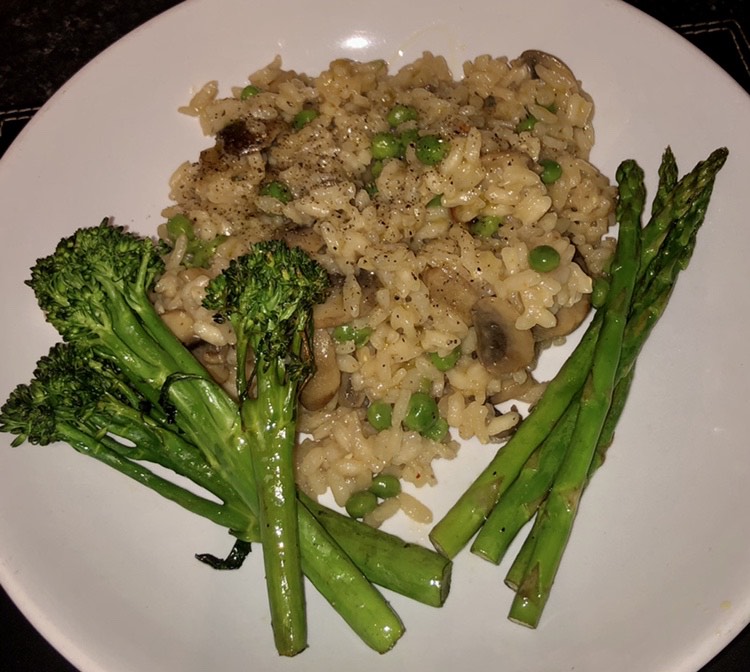
I have been meaning to post this one for a while, the main reason I have been holding back is because I just can’t seem to take a decent photo, and it never looks half as appetising as it does in real life, but I can assure you it tastes great. So here it is, my mushroom and pea risotto, perfect for this time of year, it is a real winter warmer. I love the creaminess of the rice combined with the earthy flavours of the mushrooms. Probably not the biggest selling point during these times of social distancing and isolation, but this dish is a real crowd pleaser. It is not only vegan but also 100% gluten free without the need for even the slightest substitution, and with so few and such simple ingredients it is perfect for the whole family, even fussier eaters amongst us.

People tend to think risotto is complicated and hard to make, maybe something you would only eat at a restaurant when someone else is cooking, but this couldn’t be further from the truth. It’s actually one of the most simple recipes to prepare, as long as you have the time to stand over it as the only thing that makes it slightly challenging is that the rice needs to be stirred almost constantly.

Mushroom and Green Pea Risotto

Prep Time – 10 minutes
Cooking Time – Roughly 25 minutes
Serves – 4/5 servings

Ingredients

  • 4 Tbsp Olive Oil (or oil of choice)
  • 1 red onion
  • 2/3 cloves garlic
  • 350g mushrooms*
  • 150ml vegan white wine
  • 400g arborio (risotto) rice
  • 1 tsp dried thyme
  • 1.25l vegetable stock
  • 150g thawed garden peas

Serving Suggestions

  • Nutritional yeast flakes
  • Chili flakes
  • Squeeze of fresh lemon
  • Grilled tenderstem broccoli + asparagus
  • Garlic Bread

Method

  1. Firstly mince or finely chop the garlic, slice the onions, slice the mushrooms and set aside
  2. Prepare 1.25l of vegetable stock
  3. Heat a tbsp of olive oil in a large saucepan or high sided frying pan over a medium/high heat
  4. Sautee the onions and garlic until the garlic starts to slightly brown, then add in the mushrooms
  5. Add the dried thyme and stir to combine
  6. Let the mushrooms cook for about a minute, and then add the rice.
  7. Next add a generous amount of olive oil, and stir for another minute to make sure all the rice is coated in the oil and flavour
  8. Now pour in the white wine
  9. Once the wine has absorbed/evaporated it is time to add the stock one ladle at a time, simmer the rice whilst stirring constantly *
  10. Once the liquid has absorbed add another ladle of stock and stir, repeat this process until all the stock is gone, add the garden peas with the last ladle of stock
  11. When all of the stock is used up, the risotto should be cooked, if it needs a little longer add a splash of water whilst it continues to cook.
  12. Add salt and black pepper to taste, top with nutritional yeast for a cheesy flavour, or chili flakes for a little kick. Serve on its own, or alongside steamed broccoli and asparagus or garlic bread. I like to add a little squeeze of fresh lemon also
  13. Tuck in and enjoy

Have you tried this recipe? Let me know in the comments section below. And don’t forget to share a snap on Instagram! Tag @Liv_ing.Vegan and hashtag #LivingVegan

Recipe Notes

Gluten Free – 100% gluten free without the need for substitutions

*Mushrooms – I tend to use chestnut or button mushrooms. The recipe will work with whichever mushrooms you have available. I like the flavour when using baby portobello mushrooms, but this can discolour the risotto quite a lot and almost blacken the rice.

*When adjusting the amounts for different sized portions the most important thing is to keep the correct ratio of volume of rice to stock, the ideal ratio is 3 units of stock for every until of rice.

Wine – If you prefer not to use wine in the pasta sauce it is fine to omit and substitute it for extra vegetable stock.

Spaghetti alla Crema

I posted a picture of this creamy mushroom pasta on my Instagram page a few weeks ago and never actually got around to writing up the recipe. I really have no excuse now that the whole country is in lockdown due to coronavirus, I can’t go to work, and I don’t have a lot else to do whilst we are self isolating at home. It is a scary time for the whole world, but for those of us who are lucky enough to so far be avoiding the virus, it is a great opportunity to get creative in the kitchen and try out some new recipes. This is actually one of the first pasta recipes I made after turning vegan and it still remains a firm family favourite, as well as one of my favourite recipes to cook, as it is so simple yet deliciously tasty. I found the recipe online a few years ago, but since the majority of my cooking tends to involve throwing random amounts of ingredients into a pan and hoping for the best, it will have adapted slightly over the years. The recipe below is a good guideline to follow, but one of the great things about most pasta recipes is that they don’t have to be exact, as long as you can get the correct ratio of liquid to pasta and a good amount of flavour it really can’t go wrong, this is just a template so feel free to have fun with it and make it your own.

I think what makes this recipe unique compared to other creamy pasta recipies out there is that rather than cooking a sauce and then boiling the pasta in a seperate pan, the pasta is cooked in the sauce itself, this helps it to come together better and as the pasta cooks the starch thickens the sauce giving it an all round creamier texture. It is important to get all the pasta submerged in the liquid as quickly as possible otherwise it will start to burn, the milk will soften the spaghetti slower than boiling it in water usually would, so it will take longer to become flexible enough to fit into the pan. If your pan is not big enough, you might want to consider breaking the spaghetti in half first, or using a different kind of pasta such as farfalle or fusilli.

Enjoy the recipe, and keep an eye out for more quarentine creations coming soon, but most of all stay safe!

Spaghetti alla Crema

Prep Time – 10 minutes
Cooking Time – 15 minutes
Serves – 2/3 servings

Ingredients

  • 2 Tbsp Olive Oil (or oil of choice)
  • 1 small red onion
  • 2 cloves garlic
  • 250g chestnut mushrooms*
  • 150ml vegan white wine
  • 1 tsp dried thyme
  • 1 tsp dried oregano
  • 300g spaghetti* (or GF pasta)
  • 500ml rice milk*
  • 300ml vegetable stock
  • 2 Tbsp Nutritional Yeast (optional)
  • 1 large handfull of spinach (optional)
  • Salt and black pepper

To Serve

  • Steamed tenderstem broccoli
  • Steamed asparagus
  • Garlic Bread

Method

  1. Firstly mince or finley chop the garlic, slice the onions, slice the mushrooms and set aside
  2. Prepare 300ml of vegetable stock
  3. Heat the olive oil in a large saucepan over a medium heat
  4. Sautee the onions and garlic until the garlic starts to slightly brown
  5. Add in the mushrooms and pour over the white wine
  6. Add the dried thyme and oregano and stir to combine
  7. Let the mushrooms cook for about a minute, and then pour the milk and vegetable stock into the pan
  8. Next add the pasta, breaking if neccessary to fit into the pan
  9. Ensure all of the pasta is submerged in the liquid
  10. Allow the pasta to cook for around 10 minutes, stirring occasionally to avoid sticking
  11. Once the sauce has reduced, stir in the spinach and nutritional yeast if you wish
  12. Add salt and black pepper to taste and serve alongside steamed broccoli and asparagus or garlic bread.
  13. Tuck in and enjoy

Have you tried this recipe? Let me know in the comments section below. And don’t forget to share a snap on Instagram! Tag @Liv_ing.Vegan and hashtag #LivingVegan

Recipe Notes

Gluten Free – Use your favourite kind of gluten free pasta, you don’t need to make any other changes, all of the other ingredients are already 100% gluten free!

You can use your favourite variety of mushrooms, I prefer chestnut but most varieties will work fine. I find oyster mushrooms are great for giving a more meaty texture. Portabello mushrooms taste great in this recipe but they can discolour the sauce slightly. 

I tend to use spaghetti or linguine, but you can use any kind of pasta

I find that rice milk gives the best flavour and texture for this recipe but again, any dairy-free milk will work. 

The spinach is optional, I find it adds an extra bit of texture and colour as well as added nutrient value, but the recipe is great without it too if you prefer, if I don’t have any spinach I sometimes throw in some garden peas instead. Nutritional yeast is not neccessary, but it gives the sauce an almost cheesy taste aswell as providing some essential vitamins and minerals.

Wine – If you prefer not to use wine in the pasta sauce it is fine to ommit and substitute it for extra vegetable stock.

Extra spice – If you like a bit of a kick, feel free to add a couple of red chili flakes

Orange Tofu (Vegan Orange Chicken)

Going vegan doesn’t have to mean giving up eating your favourite foods, sometimes it just means having to find a vegan alternative. When people ask if there’s anything I miss since going vegan I usually say no, but thinking about it until now orange chicken from Panda Express might just have been an exception. I have no idea why I’ve waited 4 years to try and make a vegan replica of this recipe, but it was more than worth the wait, and I definitely won’t be waiting another 4 years before I make it again. Anyone that’s ever been to Panda Express, or ordered orange chicken from a good US Chinese takeout will understand my excitement about this recipe. It was probably the one thing I missed most when I moved back to the UK and realised it just isn’t really a thing over here, I once got super excited when I spotted it on the menu of one local Chinese takeaway but I’ll never forget the disappointment when I took the lid off that box and saw it was nothing like what it is in the states.

I’ve read through a few of the best orange chicken recipes out there, trying to work out how best to adapt this to make a vegan version. So that’s enough about orange chicken now, it’s time to talk ORANGE TOFU! I think tofu works great as a chicken substitute, especially in Asian cooking, I use it in lots of recipes from salt and pepper tofu, to healthy stir fries and tofu fried rice (you can expect to see these recipes on the blog soon), it’s so versatile, and packed full of protein too. Here we have crispy golden tofu, dripping in a sticky, sweet and tangy authentic Asian style sauce. No, it’s not quite Panda Express, but it’s homemade, it’s vegan, and it’s downright delicious, whats not to love? Even my Dad, who is the most anti-tofu person I know, just tasted this and admitted he really liked it, that in itself is a massive win so I must be doing something right with this recipe.

The orange tofu itself has so much flavour, it’s best to keep everything else as simple as possible. I have served it with plain boiled white rice and brocolli, but of course, it would go great with any kind of rice and your favourite veggies. You might be wondering why I have listed sesame seeds in the recipe but there aren’t any in the photo, I didn’t realise until I was halfway through cooking that I didn’t have any, but if you do, I think they are a perfect addition to any Asian dish and make it look that little bit more authentic too.

Orange Tofu (Vegan Orange Chicken)

Prep Time – 10 minutes
Cooking Time – 15 minutes
Serves – 2/3 servings

Ingredients

For the tofu

  • 1 block extra-firm tofu, drained and pressed
  • 1/2 cup cornflour
  • 1/2 cup soya milk
  • 1/2 tsp onion powder
  • 1/2 tsp garlic powder
  • 1/4 tsp sea salt
  • Vegetable oil for cooking

For the sauce

  • 1 cup fresh orange juice
  • 2 tbsp rice vinegar (or apple cider vinegar)
  • 2 tbsp sugar
  • 2 tbsp soy sauce (Tamari if gluten free)
  • 1 tbsp sesame oil
  • 1/4 tsp garlic powder
  • 1/4 tsp ginger
  • 1/4 tsp red chili flakes
  • 1 tbsp cornflour

To serve

  • Sesame seeds
  • Cooked white rice
  • Steamed broccoli (or other veggies)

Method

  1. Start by breaking the tofu into bite-sized chunks
  2. In a small bowl, mix the cornflour, onion powder, garlic powder, and sea salt.
  3. One by one take the chunks of tofu, dip them first in the soya milk, and then into the cornflour mixture until evenly coated.
  4. In a small saucepan over a low heat, whisk together all of the sauce ingredients except for the cornflour.
  5. Heat a little vegetable oil in a large frying pan or wok over a medium heat and fry the tofu chunks, tossing occasionally until golden brown.
  6. When the tofu is almost finished cooking, whisk the cornflour into the sauce and turn the heat up slightly to simmer until thickened, keep stirring throughout.
  7. Once the sauce is thickened, combine with the tofu and serve immediately with rice and your choice of veggies.
  8. Save any extra sauce for drizzling onto the rice
  9. Sprinkle sesame seeds on top and tuck in!

Have you tried this recipe? Let me know in the comments section below. And don’t forget to share a snap on Instagram! Tag @Liv_ing.Vegan and hashtag #LivingVegan

Variations

Gluten free – This recipe is already 100% gluten free, just be sure to use tamari rather than soy sauce.

Extra spice – I’m not a big fan of too much spice so I have kept it to a minimum with just a few chili flakes for that little bit of a kick, but feel free to add more or less spice depending on how you like it, you could also add a tablespoon of sriracha into the orange sauce for an extra hit.

Vegan Pancakes

Happy Pancake Day (For Tuesday)

I promised some healthy recipes were on the way, and true to my word, I have a few ideas lined up for my upcoming blog posts. But first… Let’s talk pancakes. With my birthday coming up, I’ve been so busy eating out and celebrating with friends and family these last few days (oh, and eating cake at every given opportunity) that I’ve hardly had chance to cook, never mind the time to sit down and write recipe blogs. But I figured since an even more important day is right around the corner, the one I’ve really been waiting for, its the perfect time to share my pancake recipe.

I don’t think theres any need to waffle on about why you need pancakes in your life, so I’ll keep this one short and sweet, and crack straight on with the recipe. I might be slightly bias, but personally I think these pancakes are flipping amazing, a lot better than my puns at least!

Pancakes

Prep Time: 15 minutes
Cooking Time: 15 minutes
Serves: 8 Pancakes

Ingredients

  • 1 1/2 cups plain flour (335g)
  • 2 cups soya milk (500ml)
  • 2 tablespoons water
  • 2 tablespoons vegetable oil + extra for cooking
  • 1 teaspoon baking power
  • 2 tablespoons sugar (optional)
  • 1/4 teaspoon salt
  • 1 teaspoon vanilla extract (optional)

Method

  1. Combine the flour, baking powder, sugar and salt in a large mixing bowl or jug, add in the soya milk, water, oil and vanilla extract and whisk into a smooth batter.
  2. Heat a frying pan over a medium heat and lightly wipe it with some oiled kitcken paper. (You may need a little extra oil for the first couple of pancakes to prevent sticking)
  3. Once the oil is hot pour in the batter and tip the pan from side to side to thinly coat the base of the pan.
  4. After about 30 seconds either carefully toss the pancake, or use a spatula to gently flip the pancake to allow it to cook on the other side.
  5. Serve with your favourite toppings, and enjoy.

Have you tried this recipe? Let me know in the comments section below. And don’t forget to share a snap on Instagram! Tag @Liv_ing.Vegan and hashtag #LivingVegan

Notes:

I have used cup measurements for this recipe, but roughly converted it into grams/ml for anyone that doesn’t have cup measures. I know they are not so commonly used in the UK, but I bought some measures a few years ago after trying a few different US recipes, and they really are a game changer. I realised that because most baking relies mainly on getting the correct ratio of ingredients, it’s much easier and quicker to just use cups than having to measure and weigh everything out. For obvious reasons, when using cups to measure your ingredients, ensure that you measure your dry ingredients first, and any oily or sticky ingredients afterwards.

I prefer to use soya milk for making pancakes, but I have used almond milk in this recipe before and it works perfectly fine also, I’m sure any plant based milk will do.

Make sure to use a lightly tasting oil such as vegetable oil or sunflower oil (or coconut oil if you like the flavour), I don’t reccomend to se olive oil or any other strongly tasting oil.

Whats the best pancake topping, other than more pancakes?

I have left toppings out of the recipe, because with pancakes its all about personal preference, but I have listed some of my favourite combinations below.

  • Fresh fruit + golden syrup
  • Fresh fruit + dairy free icecream or yogurt
  • A sprinkling of icing sugar + a squeeze of either orange or lemon
  • Dairy free chocolate sauce + dairy free vanilla icecream

Vegan Bournville Chocolate Ganache Tart

Chocolate Cheesecake, Chocolate Tart, or Chocolate Torte? The answer is I’m really not sure. I made this for my family for the first time this weekend and we debated for some time about what it should be called, but there was one thing we certainly all agreed on – whatever it is, it’s absolutely delicious.

Starting sweet. When I first came up with the idea of starting a vegan blog I had visions of posting healthy and nutritious recipes with fruits, vegetables, whole foods and all things good, yet here I am writing my first post about a gooey, chocolety dessert. Admittedly, this probably isn’t the recipe for you if you’re overly conscious of your waistline, but hey, I never said veganism had to be healthy, I’m just here to prove it doesn’t have to be boring, and I’m a firm believer in a balance, which means sometimes you just need a dessert in your life to level the scales. Now, I am by no means trying to claim this tart even remotley good for anything other than your taste buds, but on top of being smooth, creamy, chocolety, and just downright irresistable, it’s also packed full of protein thanks to the tofu, so it’s a great alternate answer for next time someone asks where you get your protien from. Top it with some fresh fruit, and at a push, it could even count as one of your 5 a day.

This simple no bake tart is literally the easiest thing I have ever made. Put together in less than 20 minutes, the hardest part is having the patience to wait for it to set in the fridge for a couple of hours.

Bournville Chocolate Ganache Tart

Prep time: 20 minutes Passive time: 2 hours Serves: 8-10 servings

Ingredients

For the base

  • 150g digestive biscuits
  • 80g melted vegan butter/margarine

For the ganache

  • 349g silken tofu
  • 230g melted bounville dark chocolate
  • 2tbsp golden syrup/maple syrup
  • 1/2 tsp vanilla extract (optional)
  • 2tbsp icing sugar (optional/to taste)

Toppings (Optional)

  • Grated chocolate
  • Fresh fruit
  • Crumbled pistachios

Method

  1. Blitz the digestive biscuits using a food processor, or alternativley place in a resealable freezer bag and bash into a crumb with a rolling pin.
  2. In a mixing bowl combine the biscuit crumb with the melted margarine.
  3. Tip the biscuit mixture into a greased 9 inch tart tin. Spread evenly over the base and press it down firmly using the base of a glass so that it is compact and evenly spread.
  4. Pop the base in the freezer for 10 minutes to firm up whilst you make the ganache.
  5. In the food processor, blend the tofu until it resembles a smooth creamy consistency.
  6. Add in the melted chocolate, golden syrup and vanilla extract and blend until combined.
  7. (Optional) Taste, and add in icing sugar one tea spoon at a time for your desired level of sweetness.
  8. Scoop the ganache onto the base and level out using a spatula.
  9. (Optional) Top with grated chocolate.
  10. Leave to set in the fridge for 2 hours, or as long as you can wait.
  11. Any aditional toppings, especially fresh fruit, should be added just before serving.
  12. Enoy!

Have you tried this recipe? Let me know in the comments section below. And don’t forget to share a snap on Instagram! Tag @Liv_ing.Vegan and hashtag #LivingVegan

Variations

Use your favourite kind of dark chocolate, I used bournville because I had some left lying around after christmas, but any dark chocolate will work. Make sure to taste as you go and adjust the amounts of golden syrup or icing sugar accordingly depending on the bitterness of the chocolate you chose.

Go nuts. This recipe works great topped with pistachos but if you want a real nutty treat, feel free to fold some chopped pecans into the chocolate/tofu mixture before spreading onto the biscuit base for that extra texture and crunch.

The base. For me, when it comes to dessert there is no such thing at too much chocolate. I loved this recipe just as it is, but I’m looking forward to making it again soon using crushed oreos or bourbons in place of the digestive base.

Gluten free – The topping for the tart is already 100% gluten free. The only adaption you have to make to this recipe is to swap out the regular digestives for gluten free digestives, or even gluten free oreo style biscuits.